Terry Beresford of NZ wrote an article giving his advice about overcoming the problems of overheating in an SA or VA. The subject has also been discussed in Safety Fast! more than once. Here I summarise the issue once more and cover in more detail the task of getting the radiator out of the car, re-coring it, and putting it back.
Many of the comments below apply to all cars pre MGA, but the SA and WA cars seem more prone than most to the problem. Doubtless this was in part due to the fact that the original radiator was barely up to the job of keeping coolant below 100 degrees C in a 6 cylinder car pulling over 1 ½ tons with only 2300cc available. The radiator itself is not much larger than that fitted to T Types and the suck effect basically the same with two crude bent tin fan blades, unshrouded, running at never much more than 3500 rpm. And if the engine does exceed those revs, the heat output would rise even more than the cooling effect of a faster fan.
That over heating was a design problem is reinforced by the fact that more and more cooling vanes were added to the car in an attempt to keep the cabin cool. In the WA and VA the firewall is some way from the cabin, but in the SA it is more like a modern car, with the firewall doubling as the pedal and dash holder and footwell. The hot cabin problem would have been magnified by the massive cast iron exhaust manifolds, doubtless themselves acting as radiant heaters, and effectively, engine coolers. Further, the carburettors are just above these radiant heaters, resulting in that well-known problem of hot starting with vapour lock.
A further problem, not really cured until the TF, was that the system was unpressurised. This means that the coolant boils at 100 degrees C, which is only 20 or 25 degrees C above the operating engine temperature on a hot day. If the cooling system cannot dissipate heat faster than the engine is generating it, the coolant has only this temperature headroom before boiling, whereas in a pressurised system the headroom is at least 15 degrees more. Thus, even in a relatively overcooled but unpressurised car such as a TD, the engine will boil on a hot day in a traffic jam if the system is in any way below par.
I’m not sure of the effect of anti freeze, but I believe it lowers rather than increases the boiling point of water. Most of us these days leave anti freeze in all year round, acting as an anti corrosive as much as a coolant. The only reason that I didn’t was that the car boiled so often, I kept diluting the anti freeze with fresh water.
There is a school of thought that unleaded petrol causes engines to run hotter. I’m not sure about this, since the calorific value of the fuel is no higher than leaded fuel and the engine is doing the same amount of work. I gather that the octane of the fuel has to be raised by adding volatile aromatics rather than tetra-ethyl lead, which might mean more energy is being released, but it seems unlikely that this would make such a difference. A possible reason is that the fuel is made up of a range of octanes rather than a homogenous 95 octane, thus causing the fuel to ignite earlier and burn longer, giving an effect similar to either over retarding or over advancing the ignition, or even both! At this point, my physics is even less reliable than the cooling on my SA, so I’ll leave this subject to the experts.
The crisis point for me was my SA boiling last year on a very hot day in France. As usual, I took off the radiator cap to add cold water. I had done this several times before, and as the system is unpressurised, had believed that it would not spurt out. On each earlier occasion, this had indeed been the case, but not this time. I got a jet of boiling water in the midriff. Fortunately, the water hit the cap as I took it off, directing it sideways, rather than upwards into my face. I spent my stay in France dabbing on various creams and unguents and I still have a faint scar.
Up to this point, I had tried everything, with some limited success. To recap on these remedies, I’ll go through them in ascending order of ease/cheapness;
- Check the ignition
Retarded ignition makes an engine run hotter, but any inefficiency in the ignition timing will mean the engine will generate more heat for a given performance. The standard setting is 7 degrees of advance, ie the points open 7 degrees before TDC at idle (about 1000 rpm). The distributor weights will advance the ignition further as the revs rise, so it is important to be sure that they are working and that the springs holding them back are of the correct strength. This is almost impossible to check with confidence, the only sure fire method is for the car to be put on a rolling road and the power output tested at varying degrees of advance at different rev levels. This puts this item a bit further down the ease/cheapness list, but it is worth doing it at least once to know what settings to use in future. - Check the mixture
Weak mixture causes hot running, as do air leaks at the inlet manifold or in the balancing tube between the carbs. Air leaks are not likely to affect both manifolds, so if there is a leak it should be possible to trace it by checking the colour of the front vs the rear plugs. White is weak, black is rich, brown is about right-though unleaded fuel unfortunately tends to have much less colour variation. I have never found tuning SU carbs easy-the official rise and fall in revs as the mixture is adjusted has never seemed to actually happen, maybe because there are two carbs and the effect of adjusting one is diluted by the other. I have resorted to Colourtune, which works OK, and can be used at high revs, unlike the standard method. - Close off the by pass pipe
When new, MG cars were fitted with a thermostat that lowered a plug when the temperature rose, the plug effectively blanking off the by pass pipe. Many owners have changed these over the years for the modern wax stats which fit nicely in the housing, but which do not blank off the by pass pipe when the coolant is hot. Some will have removed the stat altogether, with the same result. If the by pass pipe is not blanked off, water will go through it rather than the radiator, in fact the system was designed to make this happen so that the engine would warm up more quickly. At the expense of slowing down the warm up process, the answer is to blank off the by pass pipe. This is pretty simple to do-just cut a blind gasket to fit where the by pass gasket fits. As a precaution against pressure build up, it is worth drilling a 3mm hole in the new gasket. Charlie Plain Jones has added two further warnings about thermostats-firstly, they should open at 70 degrees, not 80, as many modern ones fitted to replacement housings do; and if you are lucky enough to have one of the original type, make sure it actually works-it probably doesn’t! My advice is to take them out altogether if you have an overheating problem. - Clean out the radiator
If the radiator has a build up of rust and sediment, the water will simply miss out the blocked bits and come out hotter. Terry Beresford gave advice last year as to how to test for this, by feeling the temperature difference at the radiator outlet (bottom) and inlet (top), doing this within seconds of stopping the engine. Don’t do it with the engine running or you’ll put your fingers into the buzz saw of the fan blades. The SA radiator has a very simple construction which allows it to be rodded out (again see last year’s article on how to do this) but first you can try flushing it backwards by shoving a hose up its outlet. If you have had to use Barrs Leaks or similar over the years, you will almost certainly have a partially blocked radiator-if you didn’t, it would leak. - Clean out the water passages in the engine
Take off the side plate, carburettor side, which is held by multiple bolts. This allows you to poke about in the waterways with a welding rod while running a hose through the engine. Loads of red mud will come out, more than you thought could be in there. - Fit an expansion tank
David Washbourne recommends this mod, which is simple enough to do. You’ll need an empty plastic bottle of about 3 litre capacity-eg the larger size of car wash liquid from Halfords-with a plastic screw cap that is water tight. Connect a plastic tube to the radiator overflow pipe and drill a hole the width of the pipe in the cap of the plastic bottle and push the pipe inside a few inches. Fix the bottle beside the toolbox, so that it is the same height as the radiator top. When the water gets hot and expands it will run up the pipe into the bottle, and when the system cools it will run back again. Note that this will not stop the system boiling, it will only conserve water when it does overheat, instead of pouring it out onto the road. - Fit an electric fan
SVW Spares sell a fan that bolts directly on to the front of the radiator, so that it is semi hidden behind the slats. These fans have an adjustable thermostat, the reader for which is a brass bottle that fits inside the top hose. The fan will switch in at the preset temperature. In theory, it will replace the fan blades, which can be discarded, giving a BHP or two as a bonus. In practice, I found that the electric fan was not enough on its own when idle in traffic-but there is no doubt that the two together are better than the fan blades alone, but only in stationary or slow moving traffic. Above, say, 40 mph, the ram effect of air through the radiator is much higher than the blowing power of the fan, which is not really doing anything much except partially blocking the radiator. The Kenlowe fan is exactly the same in principle, but is held on a frame inside the engine bay so it is more obvious. - Shroud the fan blades
Terry gave a diagram for this last year. It needs a bit of metal working skill and will look out of place, but apparently it increases the fan efficiency dramatically. - Re-core the radiator, or add an extra salvaged radiator
Again, see Terry’s article on using a Landrover radiator to supplement the original one. If you want to re-core the radiator, read on!
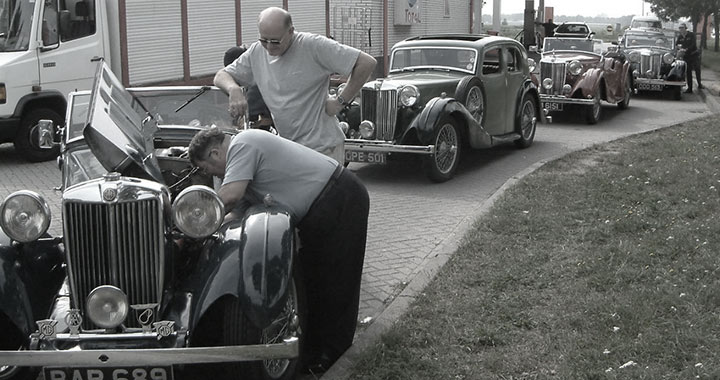
David Washbourne gave me a hand to get the radiator out, and his diagram and notes for this follow. I have also taken some Haynes-type photos to illustrate the task, which is not really difficult or complicated, but which will take a bit longer than you thought. Everything is much easier with the bonnet off the car, though you can get away with sliding it back towards the windscreen. Taking the bonnet off sounds simple enough, but the weight and the triple hinges make it hard work even for two people. With three, one on each side and one in the middle to stop it sagging, it’s a doddle.
You can also leave the chrome surround on the radiator (the bolts holding it on can be hard to get back) but if the radiator is going to a specialist for re-coring it will have to come off anyway.
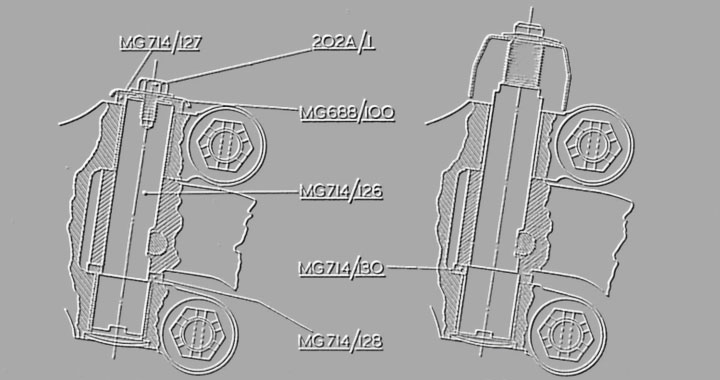
Removing the Radiator
In order that time and effort in removing the radiator may be reduced, it is suggested that the headlights are not removed which would mean, amongst other things, easing off the glass and reflectors in order to disconnect the wiring.
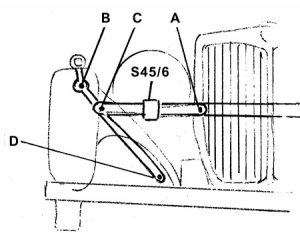
The diagram applies to both sides of the radiator.
- Drain off the water system.
- Loosen the top and bottom hoses – this is best done by rotating them with a steady grip by hand in their present positions.
- Undo the stay bars.
- Loosen the headlight bracket (part No.S45/6) on the lateral bar and remove the pinch bolt.
- Increase the gap in the headlight bracket by using a large screwdriver.
- Slide the loosened headlight towards the radiator along the bar and carefully ease the wiring through the gap.
- Undo the cross bar at A.
- Undo bolt at B and remove.
- Loosen at C and D.
- With the bolt at B removed, the wing stay should be eased away and in so doing the lateral bar supporting the headlight will slide through and so leave the end nearest the radiator clear at A.
- Undo the two captive bolts at the base of the radiator. With the two hoses (see 2 above) now sufficiently loose lift the radiator out.
by David Washbourne
I took the radiator to a well-known local man, called Bryan of Bryan and Son. He is in fact the son of Bryan, a Jamaican who came here in the 60’s and set up in Tunbridge Wells, giving his son two pence an hour for helping him in the workshop. The workshop is much the same now as when it started and you can see from the photos that Bryan gets a lot of work from pre-war cars. His verdict on my radiator was that it was beyond hope – it was choked with hardened red mud. He would have been happy to rod it out, saving some of the cost, but felt that, in view of its poor initial design, recoring would provide a permanent solution. He proposed a high efficiency core, as used in stationary road building vehicles, which would result in exactly the same external dimensions and appearance, but with at least treble the original efficiency. He also proposed fitting tubes to hold the electric fan bolts in case I wanted to refit it.
A few days later I collected the completed radiator. It looks identical to the original, the only visible change being a coat of gloss black paint.
Putting it back in was a lot harder than getting it out, mainly because the various bits of metal had to be pulled together to get the holding bolts in. Its all too easy to mark the paintwork or chip the chrome, so patience and frequent rests are recommended. I decided to refit the electric fan, even though it may now be superfluous. At worst, it would allow me to remove the original fan blades if I wanted, and save me the task of getting the rad off the car again.
So far, the change has been 100% successful, but with the ambient temperatures of a wet English Spring, that’s not yet conclusive. The hardest test for the car is climbing a long steep hill from rest when at working temperature-previously, the needle would climb inexorably, it being touch and go whether it would get to 100 degrees before the top of the hill. This time it started at 60 degrees and nonchalantly went up to 70 and stopped there. It stayed at 70 for the rest of the trip, indicating that it is not over cooling. So, I’m hopeful that the overheating is at last cured.
The cost? £230, or £50 for rodding out the radiator. Not chicken feed, but not a fortune either. It is certainly worth it if I never get scalded again.
I have some left over creams and unguents, mainly French, going cheap.