This is the second of a three-part article (see Rocking & Rolling and Rocking & Rolling – Part 3) appeared in last year’s Review (Issue 11) and both articles should be read together if you wish to carry out a comprehensive appraisal of your own car’s suspension and braking condition. Every item should be examined, because it only takes one worn part to cause a problem. It really is quite surprising just how good to drive the SVWs actually were when they were new! Most of us currently have some wear on our cars in the steering, suspension and brake systems, and we just assume that pre-war MGs were always tiring to drive. Borrow a fully overhauled car and experience the difference! Forget the cosmetic job you had been planning for next year-spend your hard-earned pennies underneath your SVW this time, and you’ll know it was worth it. You may not see the difference, but you will certainly feel it for years to come!
Torque Cables
All SVW cars have these on both sides of the front axle. They are very necessary to prevent the front axle rotating as one item with the front wheels during heavy braking. If they are not adjusted properly, or more seriously, one side is slacker than the other, the front axle could in effect move forward more on one side than the other and cause the car to swerve! To adjust the cables, the full weight of the car needs to be on its suspension. (i.e. Jacks safely under each side of the front axle, not just one in the middle which could cause the axle to snap!). The torque cable should be able to move at its mid-point, up and down a total distance of 0.75 to 1.00 inches, i.e. approximately 0.50 inches either side of the mid point. The locknuts on the end of both cables can be adjusted to achieve this. These nuts must be tight on completion. Both torque cables must have the same slack adjustment.
Fluid Leakage at the Brakes
Any sign of wetness around the brake drum backplates, or on the inside sidewalls of one or more tyres, is an indication of either brake fluid leakage or worn oil seals and will be an MOT failure. Both are potentially very serious problems which can lead to total brake failure on that wheel, or the whole car if not attended to immediately! Usually it is first apparent with reduced braking performance and a tendency for the car to pull to one side when braking. The wheel and drum will need to be taken off the offending axle. If there are signs of fluid leakage, it is always wise to overhaul all four brake assemblies and the Master Cylinder at the same time, since their components are likely to be the same age and in the same poor condition!
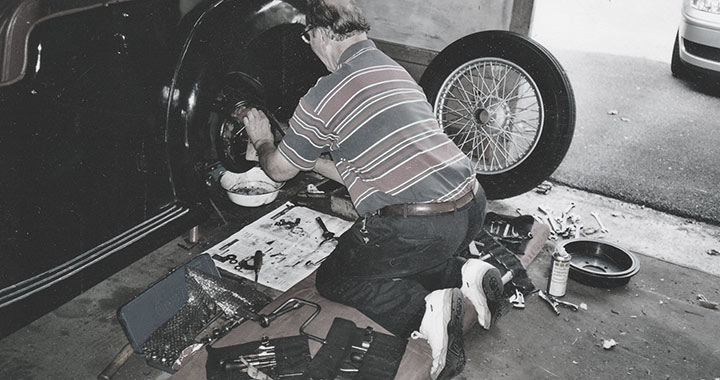
Remember to slacken off both brake adjusters on each wheel to provide sufficient clearance between the shoes and brake drum to allow for its removal. Once a drum is removed it is usually very apparent whether the leakage is from an oil/grease seal, or one of the hydraulic brake cylinders. (Or even the hydraulic pipework to that wheel!) When new seals are fitted it is important to grease them first, fit them squarely in the bore, and carefully press them to the full extent of the recess without damaging them, and with the “hollow” face on the oil/grease side. The surface of the rotating part must be smooth and show no signs of grooving or wear as even a new seal will leak immediately against a worn surface! In the case of hydraulic oil leakage at the Wheel Cylinders, there is usually one of two causes. Either the special rubber seals are perished/damaged, or the cylinder bore is scored/corroded. Seal replacement is straight forward, but if the inner surface of the brake cylinders is corroded then either new cylinders must be fitted or the cylinders need sending away for re-sleeving.
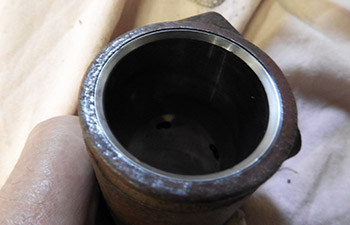
Brake cylinder re-lined with rust proof stainless sleeve
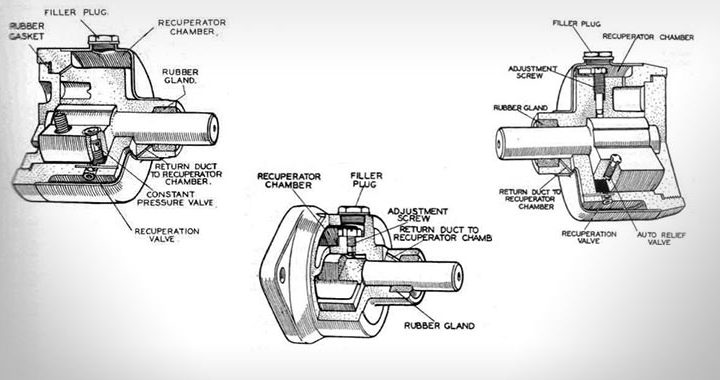
Re-sleeving is a specialist job as not only has the inner bore of the sleeve to be honed to a fine finish, but the sleeve itself must be a fluid-tight fit in the cylinder especially where the hole is bored through the sleeve for the hydraulic pipe connection! It is absolutely essential that every re-sleeved wheel or master cylinder is fully pressure-tested and certified as such before accepting back from the supplier! If only one Wheel Cylinder is showing corrosion, look very carefully at all the other three Wheel Cylinders and the Master Cylinder too, as it is very likely that the water naturally absorbed from the atmosphere by brake fluid will have corroded the whole braking system over the years, and not just one component! Silicon brake fluid does not absorb moisture and can be used instead of normal brake fluid. It is several times more expensive, can only be topped up with compatible silicon fluid, requires that the whole brake system be emptied, flushed out with methylated spirit and then fully dried out before adding this fluid. Some brake rubbers swell up in contact with silicon brake fluid, so all the rubber components in the brake and master cylinders should be replaced with new ones which have been pre-soaked for several days in silicon fluid to ensure they do not swell up. This whole process is a lot of work, for marginal gain. It is perhaps better to use normal brake fluid and flush out the system every five years! Master Cylinders can be re-sleeved but this is difficult, due to the length of the sleeve and the fact that there must be no internal leakage at any of the numerous oil passages through the sleeve at the internal sleeve/body interface, which would make the master cylinder ineffective! The WA Master Cylinder is of the tandem type and has a very long body and very thin cylinder wall. It is extremely difficult to successfully sleeve this type of cylinder. In all cases the master cylinder sleeve must be safely retained in the body of the cylinder by an extra internal circlip inside the open end. If this is left off, internal pressure on severe braking could overcome the press fit and force the sleeve completely out, causing sudden and total brake failure!
Brake Shoes
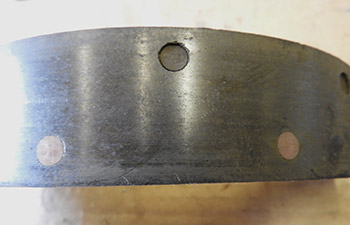
Worn brake lining
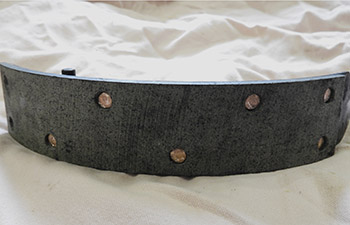
Re-lined rear brake shoe
On inspection, the linings on the shoes must never be worn down to the copper rivets holding the linings, as these will score the drum surface. If the linings need replacing, either because they are worn, or saturated with brake fluid, ready-assembled brake shoes can be purchased which already have the linings fitted, or bare linings are also available which can be riveted in place of the worn ones. (Riveting takes some skill as it is essential that all the rivets are tight and there is no air gap between the lining and the metal shoe, as this would make brake adjustment difficult and could cause the brakes to “drag”.
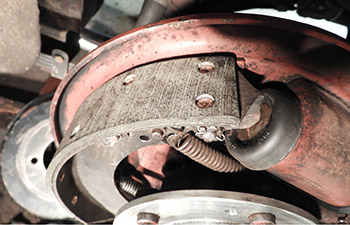
Re-lined rear brake shoe – fitted
On WA brakes, the two shoes are supported on individual pivots rather than one shared pivot pin. This is probably necessary because of the very large drum size on these cars. The pins are machine eccentrically so they can be turned to obtain the best fit of the shoe with the drum. When the car is new, these pins are correctly adjusted and then stamped with arrows which face each other. If the linings or shoes are subsequently replaced, these pins will need readjusting and may not line up as before. This is a somewhat tedious task to correct as jigs were probably originally used at the factory. The only way to find the correct adjustment for WA’s without the use of a jig, is to assemble all the brakes starting with the eccentric arrows facing each other. Adjust all the brakes and drive the car a few miles whilst repeatedly applying the foot brake. If the car pulls up well and in a straight line, no further adjustment is necessary. However if a wheel locks up under moderate braking, or the car veers to one side, or the brakes are generally ineffective, then all the drums must be taken off and the surface of the linings examined to see where each lining is making contact with its respective drum!
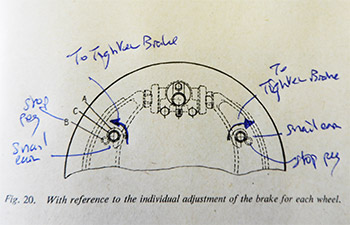
Brake shoe adjustment in ‘Blower’
Each pin will need to be turned to realign its respective shoe to give a better fit with the drum. This process may take more than one adjustment, disassembly and reassembly, but is well worth the effort. The best tip is to remember that the front brake shoe on each wheel, and especially on the front wheels, does nearly all the braking on SVW cars when driving forwards, so these are the shoes to get as correct as possible. If the wear pattern only shows at the brake cylinder end of this front shoe, the wheel will tend to lock-up and skid when braking, whereas if the wear pattern is near the pivot, the brakes will hardly work at all until the linings have fully bedded in, which may take many, many miles. Ideally the wear should be uniform over the whole surface of each shoe on all four wheels, otherwise the car will veer to one side every time the brakes are applied.
Brake Bleeding
This is necessary if the footbrake feels “spongy” when pressed hard, or after any of the brake hydraulics have been disconnected, or if the brake fluid level in the Brake Master Cylinder has been allowed to drop below the reservoir outlet.(For example, when bleeding the brakes!) It is very important to bleed all four wheel cylinders in turn, and to ensure that no air is sucked back into the system on the return stroke of the brake pedal. The best way to avoid this problem is to push a length of clear hose tightly onto the brake cylinder bleed nipple, and drop the other end into a clear container partly filled with new brake fluid. This will allow the escaping air bubbles to be visible on each downward stroke of the foot brake pedal, and as long as the open end of the tube remains below the surface, only clean brake fluid will be sucked back into the system, if the nipple is not fully closed on the upward stroke.(A kit can be bought for this purpose). Whilst bleeding the brakes, it is essential to watch the brake fluid level in the master cylinder reservoir at all times and top it up regularly. An empty reservoir negates the whole process by allowing air back into the pipework again!
FootBrake Adjustment
It is very important to achieve correct adjustment on all four wheels. This should be done after all the other items above have been checked and corrected. Firstly, release the hand brake, and completely slacken the two adjusting wing nuts connecting the hand brake cables to the rear brakes. (This is necessary to prevent any residual hand brake tension affecting the adjustment of the footbrake.) The original hand-turned adjusters fitted to some SVW cars (especially early VA’s) are not always easy to set correctly. It is better to purchase the later designed hexagon head adjusters. These are a direct replacements and allow adjustment with a spanner, which is much more accurate. With each wheel jacked off the ground and both brake adjusters slackened sufficiently for the wheel to be spun freely, gradually tighten one of the adjusters. Maximum adjustment is less than a full turn, so this is a sensitive job. It helps if a second person is available to keep pressing the foot brake between adjustments to help the brake shoe centralise properly. (It is also very important on WA’s not to fully tighten any of the brake adjusters in one movement from the fully slack position without keeping the foot brake pressed, as the push rods between the hydraulic cylinder and brake shoes are very short and can drop out of position if the adjustment clearance becomes too large! This will either make the brake totally ineffective if the rod drops out completely, or can seriously reduce the braking effect on that wheel if the rod slips into a diagonal position and only exerts an oblique force on the shoe!). Each brake shoe is correctly adjusted when a very slight drag can be felt as the wheel is turned by hand through a complete revolution. The other brake adjuster on the same wheel should be tightened similarly. The very slight drag will soon disappear as the shoes bed in. (Note; If one or more of the brake drums become very hot after a few miles of normal driving, then it is probably the brakes which have been adjusted too tightly. The brake shoes on the hot drum will need slackening immediately as the fluid could reach boiling point and the brakes fail!) Drums should never become too hot to touch during normal driving! |Remember the adjusters tighten in opposite directions! When looking from under the car towards the backplate, the left hand adjuster tightens anti-clockwise, and the right hand one tightens clockwise.
Hand Brake Adjustment
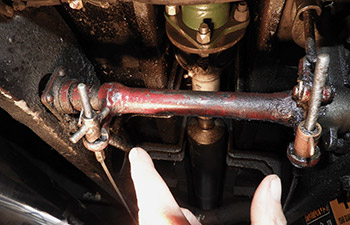
Hand Brake cables – wing nut adjustment
When the brakes on all four wheels have been adjusted, the two hand brake wing nuts previously slackened should be partially tightened with the hand brake in the off position. There must always be some slack in these two cables or the brakes will never release cleanly. The slack should be equal on both cables. It is good practice after adjustment to jack up both rear wheels simultaneously and gently spin them by hand to check that they are not binding.
All these checks may seem a bit daunting at first, but if you really want to experience your car as it felt the day it left Abingdon, then all these points need to be examined to find the one or two which need fixing. It would be very unusual to have all these faults simultaneously, they are all included here so each one can be checked once and problems identified and corrected. Once sorted, apart from routine brake adjustment and servicing, most will stay in good condition for very many years, so it will be worth all the effort! Best of luck, enjoy your driving and “Rock and Roll” no more!

