Tips on Maintenance
The experience of driving a ‘well maintained’ SVW car can be quite a revelation! Not only is the car quieter than expected, with none of those rattles and shakes many of us just come to accept, but the road manners, handling and braking are surprisingly good! We often forget that in many cases our cars are even older than their drivers! Just like us, the cumulative effect of wear and tear in all the components results in poor performance and tiresome habits! These notes are an attempt to give ‘SVW’ members some diagnostic self-help to check possible causes of any road handling problems they may have with their cars. Most of this applies to other marques of MG as well. The notes are in no specific order and may require further reading or advice to cover the finer details of maintenance and correction. Many of the advertisers in this and past ‘SVW Reviews’ specialise in the areas covered and will be able to offer expert advice and help. As any one of these items can affect your car, ALL items will need to be visually checked and corrected to achieve the best results. Always remember that, when new, SVW cars exhibited good road handling and effective, straight-line braking.
Tyres
Check that there are no bulges in side walls or tread, tyre pressures are correct on all four tyres, and tyre size, rating, and type, are correct for all wheels. (Now an MOT requirement). There should be no evidence of sun-damage hairline cracks in sidewalls. (Check spare too!).
Wheels, Spokes and Spinners
There should be no missing, bent, or loose wheel spokes. (MOT failure risk). Wheels must run reasonably ‘true’ when jacked off the ground and spun by hand. (1/8th inch deflection is probably permissible at the rim, but any deflection makes front wheel alignment difficult. Always fit the two most ‘true’ wheels on the front for this reason and include the spare in this selection). The spokes should all ‘ping’ when tapped with a screw driver. A ‘dull’ note means that particular spoke needs tightening to give the same sound as the others. If the screwed fitting on the end of the spoke is rusted solid making tightening impossible, the spoke will have to be cut in half with a hack saw, the tube deflated and the tyre taken off the wheel to allow removal of the old spoke and replacement with a new one, which will then need retightening to achieve the correct ‘ping’. It is important that all the exposed ends of the spokes around the wheel rim are covered with tape prior to refitting a tyre in order to protect the inner tube from damage.
It should never be possible to ‘rock’ the wheels when raised clear from the ground!
It is very unusual to find any ‘rock’ evident on the rear wheels because of the solid nature of the rear axle. The most likely culprit for the rear wheels is a slack wheel Spinner nut. Tightness should be routinely checked every few weeks anyway, as it may become a serious defect if left unattended. Not only could the wheel come off the car, but this condition invariably causes the splines to wear away. In severe cases this can allow the drive from the back axle half-shafts to ‘slip’! More seriously, it can also allow the wheel to rotate freely even when the brakes are applied, effectively providing nil braking on that wheel! This is particularly serious if a wheel with a worn spline is fitted on the front, after being transferred from the rear or spare at some stage earlier! (Remember that both the driver’s side wheel Spinner nuts tighten ‘backwards’, i.e. anti-clockwise!)
Carefully check the wheel rims for hairline cracks or rusty stains along, and parallel to the edge of the rim, especially on the lowest point of the spare wheel rim. Over the years, rain water collects between the spare tyre and it’s wheel rim, especially if the tyre is left underinflated for an extended period. This is quite a common situation and the wheel rim can corrode right through from the inside outwards. The consequence is a badly split wheel rim and the potential for a serious tyre blowout!
Front Wheel Alignment
If the front wheels are pointing outwards, even slightly, the handling will be seriously affected. The car will not maintain a straight course without constant correction even on a straight road, and will feel quite unstable. On cornering, the effect is even more marked, because as soon as the car starts to lean, the weight will transfer to the outside wheel, which will be pointing slightly in the wrong direction! The car will then take a wider course than expected and require split second correction by the driver to stay under control! This is why all rear-wheel drive cars actually have their front wheels adjusted to ‘toe-in’ slightly. It gives much more assured handling and is carefully specified by the manufacturer so as not to cause unacceptable tyre wear. Most Tyre Fitters can check the wheel alignment, but they can only do this accurately if the wheels run true, i.e. are not bent anywhere around the rim circumference, which is why the two most ‘true’ wheels should always be fitted to the front axle before any wheel alignment checks are carried out..
Wheel Balancing
This is not critical on SVW cars unless tyres/wheels are very unbalanced, because generally our road speeds are modest. However, if a wheel does feel unbalanced, especially on the front where cyclic kick-back at the steering wheel will be felt, firstly check that the tyre has been fitted centrally on the wheel rim. Usually tyres have raised lines running around the tyre wall which should be concentric to the wheel rim, i.e. a constant gap all the way round the rim. If this is not constant, the tyre will need deflating completely and re-centralising on the wheel. This is a common fault because the tyre beading is not always stiff enough to self-centralise when first fitted. If vibration is still present, and the shock absorbers are full of fluid and working effectively, then the tyres/wheels need balancing. Usually, tyre fitting companies only balance SVW type wire wheels ‘statically’. This is because the modern weights which clip onto the rim will not fit pre-war wheels, so they cannot be dynamically balanced on the inside and outside rims. The only option therefore is to use stick-on lead weights as used on modern alloy wheels. These are partially hidden behind the spokes on the centreline of each wheel rim, and do an identical job to the original lead-washer balance weights fitted as original equipment to some ‘SVW’ cars. (Ensure the tyre fitter cleans the inside of the rim first with solvent to ensure the balance weights stick on effectively).
Steering and Suspension Wear
‘Rock’ in the front wheels can indicate quite a number of differing problems relating to steering or front suspension wear. Often several types of wear are present simultaneously, so never assume that just fixing one item will improve anything. Loose wheel Spinner nuts should be checked first, (as mentioned earlier), then the causes of ‘vertical’ and ‘horizontal’ wheel ‘rock’ need to be examined. (This is a common MOT failure area). A second person with an inspection lamp is crucial in helping to identify all the actual wear points. Holding a jacked up front wheel at its top and bottom, check the vertical wear by rocking the wheel towards and away from the car. There should be no movement. If there is, look carefully to see if it is only the wheel itself which is rocking on it’s stub axle, or if there is slack between the stub axle and the front axle at the kingpin, or perhaps there is movement in both areas! If it is the former, spin the wheel to listen/feel for the slight ‘rumble’ of worn front bearings. Even if only one bearing needs replacing, always replace both. If the bearings seem o.k. they may just need tightening by means of the central nut. When tightened correctly, the wheel should always rotate easily as bearings must never be overtightened. (Always replace wheel nut split pins with new ones). Wear at the kingpin may be in one of three areas. The steel kingpin itself is worn, the two bushes in the stub axle which rotate on the top and bottom of the king pin are worn, or the hole in the front axle beam which holds the kingpin is itself worn. Often it is the first two areas, but occasionally the latter as well if the locking cotter pin has worked loose. Unfortunately there is no simple remedy if the axle hole is worn, although people have been prepared to open out and re-bush this hole with a steel sleeve, the weakened front axle may crack at this point if the axle is subject to a sudden shock. The best solution is probably a replacement axle, but first check both king pin holes on the replacement axle with a new kingpin before parting with your cash, as most will show some wear! New kingpins, bushes and seals are readily available, but once pressed into the stub axle these bushes will need careful in-line reaming with an adjustable reamer to give a sliding fit for the kingpin. Unfortunately, and unexplainably, the VA kingpins are stepped and the bushes are therefore slightly different diameters. This make accurate, in-line reaming very much more difficult and is perhaps best left to a machine shop.
Check the wheel ‘rock’ in the horizontal direction by grasping the front road wheel at its front and rear edges and try to swing the wheel in and out on its normal steering axis. Have someone hold the steering wheel to stop it turning, or tie it down. Again there should be little or no slack. This test is best done with both front wheels jacked safely off the ground. With someone holding the passenger front wheel fore and aft, whilst rocking it inwards and outwards,a second person with an inspection lamp should closely examine each steering component in turn including it’s joints or bearings, looking for loose movement. Areas of wear should be noted and the other wheel rocked too and wear noted there also. Typical areas likely to need attention are the knuckles at the end of the Track Rod, the ball joints at either end of the Draglink assembly, and the bush on the Steering Box where the drop arm connects to the rocker shaft. Also, nuts on all components must be tightened to the specified torque after first removing the split pins.(This is especially important on the steering box drop arm which occasionally works loose if the conical splines wear!). Remember to refit new split pins. The knuckles and ball joints are straight forward to replace, but the steering box bush requires removal of the whole box and steering column assembly. (This can be done without removing the radiator on the VA, but not sure on the SA or WA.)
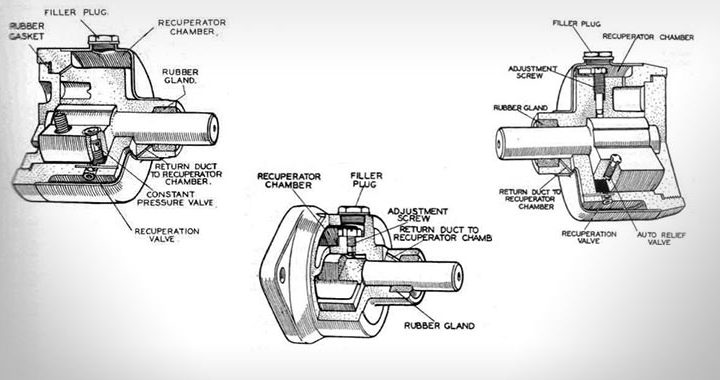
Steering Box Assembly
When the steering wheel is turned backwards and forwards with the front wheels in the straight ahead position, there should be hardly any slack ‘play’ at the mid point. If there is play, it may be due to wear in the components already checked above, or the problem may be inside the box itself. Temporarily clamp the drop arm to the chassis, so it is unable to move, and if there is still play at the steering wheel then the steering box/column needs attention. Firstly check the clamping mechanism which allows the steering wheel to be adjusted up and down for driver comfort. Often, the over-centre clamp breaks and this bolt is loose. Either, replace the clamp, or just fit a normal bolt with the steering wheel in it’s most comfortable position. If there is still slack, it is possible to remove shims in the steering-box side-plate and end-plate to take up wear. This is straightforward, but can be difficult to rethread the horn wires back down the central concentric tube. Repair kits are available with all the necessary bearings, shims and seals, but again the press-in bushes need reaming carefully with an adjustable reamer. If the worm on the end of the steering column itself is worn, then a new worm assembly will be required and it is probably more economic to have a specialist supplier rebuild the whole box for you. The steering box is designed to have play at either extremity of steering lock. If the shims have been correctly adjusted for the straight ahead position and the steering becomes tighter, instead of slacker on full lock, then the worm is worn beyond repair and a new one is needed.
Brake Drums
Front wheels should spin freely, rear wheels will have some slight resistance due to the Differential. Immediately after brake adjustment, there may be very slight friction which should soon disappear as the brakes wear, but this friction must be constant throughout a complete wheel revolution. Any signs of binding, especially if always at the same point on the wheel, indicates a distorted brake drum, requiring drum removal and either re-machining or replacement.
Braking Performance
If the brakes are ineffective, or the car always pulls to one side, there are many possible causes. The first things to check have nothing to do with the brakes themselves, but can cause the car to veer badly, especially under heavy braking. It is worth checking these first before dismantling the brakes themselves.
Examine the rear axle carefully. If the two ‘U’ clamps which hold the rear axle to the rear springs are loose, it is possible for the axle to move back on one, or both sides, under braking. This rear axle steering effect will cause the car to swerve badly! (There is a location dowel to help reduce this, but if left unattended the dowels can wear away). The ‘U’ clamps should have two nuts per thread, so the lower ones will need to be slackened first to allow the upper ones to be fully tightened. Remember to re-tighten the lower nuts again afterwards. (If they are missing or loose, the car will fail its MOT!). Also check cracks across the rear leaf springs, especially the top leaf between the ‘U’ clamp and front shackle. This top leaf can break completely across it’s width! The other leaf springs in the bundle may still support the car’s weight, but as the only tie back from the rear axle to the chassis is through the top leaf forward to the ‘Silentbloc’ rubber shackle bush, all the rear axle acceleration and braking stress is through this single flexible component!. It is therefore possible for things to look O.K. at a glance, yet the rear axle can be able to move backwards, or forwards, alarmingly! The rear shackle assembly is fed by only one grease line to the two shackles from the grease nipple manifold. If one shackle stops receiving lubrication because its local feed connection has become blocked with thicker grease, it will not be immediately obvious until that shackle has become worn and starts showing rusty stains. This is not a major road-handling issue unless severely worn, but should be corrected when noticed. The best solution is to disconnect the lower shackle, plug the grease feed pipe so it only feeds the top shackle and refit a local grease nipple on the lower shackle. This now requires local grease gun application, which can be done at the same time as the prop-shaft lubrication, so is no great inconvenience.
The ‘U’ clamps on the front axle need similar attention to the rear ones as mentioned earlier, and also the top leaf needs examining for breakage. This leaf should be carefully inspected between the ‘U’ clamp position and the rear shackle, as it is this single flexible leaf which takes most of the full braking stress on the whole car and if it has broken, the whole front beam axle can move and cause the car to swerve badly. Again, the condition of the front shackles, pins and side plates should be examined and rectified as necessary. On WA’s the Wolesley type ‘Kick Shackle’ is fitted to the rear shackle on the driver’s side front spring. This is designed to actually allow the drivers side front axle to move backwards very slightly, thereby reducing the shock at the steering wheel! The Kick Shackle adjustment is therefore very critical, and must be accurately shimmed to allow no more than 20 thousands of an inch play. Unfortunately, there is no provision for lubrication of the hardened pivot pins and side plates on this mechanism, which wear with time and cannot be re-machined without weakening the pin dangerously! Any wear is amplified twofold by the lever action, so potentially this is major headache in maintaining straight-line performance on braking for WA’s.
Torque Cables
All SVW cars have these on both sides of the front axle. They are very necessary to prevent the front axle rotating as one item with the front wheels during heavy braking. If they are not adjusted properly, or more seriously, one side is slacker than the other, the front axle could in effect move forward more on one side than the other and cause the car to swerve! To adjust the cables, the full weight of the car needs to be on its suspension. (i.e. Jacks safely under each side of the front axle, not just one in the middle which could cause the axle to snap!). The torque cable should be able to move at its mid-point, up and down a total distance of 0.75 to 1.00 inches, i.e. approximately 0.50 inches either side of the mid point. The locknuts on the end of both cables can be adjusted to achieve this. These nuts must be tight on completion. Both torque cables must have the same slack adjustment.
Fluid Leakage at the Brakes
Any sign of wetness around the brake drum backplates, or on the inside sidewalls of one or more tyres, is an indication of either brake fluid leakage or worn oil seals and will be an MOT failure. Both are potentially very serious problems which can lead to total brake failure on that wheel, or the whole car if not attended to immediately! Usually it is first apparent with reduced braking performance and a tendency for the car to pull to one side when braking. The wheel and drum will need to be taken off the offending axle. If there are signs of fluid leakage, it is always wise to overhaul all four brake assemblies and the Master Cylinder at the same time, since their components are likely to be the same age and in the same poor condition!
Remember to slacken off both brake adjusters on each wheel to provide sufficient clearance between the shoes and brake drum to allow for its removal. Once a drum is removed it is usually very apparent whether the leakage is from an oil/grease seal, or one of the hydraulic brake cylinders. (Or even the hydraulic pipework to that wheel!) When new seals are fitted it is important to grease them first, fit them squarely in the bore, and carefully press them to the full extent of the recess without damaging them, and with the ‘hollow’ face on the oil/grease side. The surface of the rotating part must be smooth and show no signs of grooving or wear as even a new seal will leak immediately against a worn surface! In the case of hydraulic oil leakage at the Wheel Cylinders, there is usually one of two causes. Either the special rubber seals are perished/damaged, or the cylinder bore is scored/corroded. Seal replacement is straight forward, but if the inner surface of the brake cylinders is corroded then either new cylinders must be fitted or the cylinders need sending away for re-sleeving.
Re-sleeving is a specialist job as not only has the inner bore of the sleeve to be honed to a fine finish, but the sleeve itself must be a fluid-tight fit in the cylinder especially where the hole is bored through the sleeve for the hydraulic pipe connection! It is absolutely essential that every re-sleeved wheel or master cylinder is fully pressure-tested and certified as such before accepting back from the supplier! If only one Wheel Cylinder is showing corrosion, look very carefully at all the other three Wheel Cylinders and the Master Cylinder too, as it is very likely that the water naturally absorbed from the atmosphere by brake fluid will have corroded the whole braking system over the years, and not just one component! Silicon brake fluid does not absorb moisture and can be used instead of normal brake fluid. It is several times more expensive, can only be topped up with compatible silicon fluid, requires that the whole brake system be emptied, flushed out with methylated spirit and then fully dried out before adding this fluid. Some brake rubbers swell up in contact with silicon brake fluid, so all the rubber components in the brake and master cylinders should be replaced with new ones which have been pre-soaked for several days in silicon fluid to ensure they do not swell up. This whole process is a lot of work, for marginal gain. It is perhaps better to use normal brake fluid and flush out the system every five years! Master Cylinders can be re-sleeved but this is difficult, due to the length of the sleeve and the fact that there must be no internal leakage at any of the numerous oil passages through the sleeve at the internal sleeve/body interface, which would make the master cylinder ineffective! The WA Master Cylinder is of the tandem type and has a very long body and very thin cylinder wall. It is extremely difficult to successfully sleeve this type of cylinder. In all cases the master cylinder sleeve must be safely retained in the body of the cylinder by an extra internal circlip inside the open end. If this is left off, internal pressure on severe braking could overcome the press fit and force the sleeve completely out, causing sudden and total brake failure!
Brake Shoes
On inspection, the linings on the shoes must never be worn down to the copper rivets holding the linings, as these will score the drum surface. If the linings need replacing, either because they are worn, or saturated with brake fluid, ready-assembled brake shoes can be purchased which already have the linings fitted, or bare linings are also available which can be riveted in place of the worn ones. (Riveting takes some skill as it is essential that all the rivets are tight and there is no air gap between the lining and the metal shoe, as this would make brake adjustment difficult and could cause the brakes to ‘drag’. On WA brakes, the two shoes are supported on individual pivots rather than one shared pivot pin. This is probably necessary because of the very large drum size on these cars. The pins are machine eccentrically so they can be turned to obtain the best fit of the shoe with the drum. When the car is new, these pins are correctly adjusted and then stamped with arrows which face each other. If the linings or shoes are subsequently replaced, these pins will need readjusting and may not line up as before. This is a somewhat tedious task to correct as jigs were probably originally used at the factory. The only way to find the correct adjustment for WA’s without the use of a jig, is to assemble all the brakes starting with the eccentric arrows facing each other. Adjust all the brakes and drive the car a few miles whilst repeatedly applying the foot brake. If the car pulls up well and in a straight line, no further adjustment is necessary. However if a wheel locks up under moderate braking, or the car veers to one side, or the brakes are generally ineffective, then all the drums must be taken off and the surface of the linings examined to see where each lining is making contact with its respective drum! Each pin will need to be turned to realign its respective shoe to give a better fit with the drum. This process may take more than one adjustment, disassembly and reassembly, but is well worth the effort. The best tip is to remember that the front brake shoe on each wheel, and especially on the front wheels, does nearly all the braking on SVW cars when driving forwards, so these are the shoes to get as correct as possible. If the wear pattern only shows at the brake cylinder end of this front shoe, the wheel will tend to lock-up and skid when braking, whereas if the wear pattern is near the pivot, the brakes will hardly work at all until the linings have fully bedded in, which may take many, many miles. Ideally the wear should be uniform over the whole surface of each shoe on all four wheels, otherwise the car will veer to one side every time the brakes are applied.
Brake Bleeding
This is necessary if the footbrake feels ‘spongy’ when pressed hard, or after any of the brake hydraulics have been disconnected, or if the brake fluid level in the Brake Master Cylinder has been allowed to drop below the reservoir outlet.(For example, when bleeding the brakes!) It is very important to bleed all four wheel cylinders in turn, and to ensure that no air is sucked back into the system on the return stroke of the brake pedal. The best way to avoid this problem is to push a length of clear hose tightly onto the brake cylinder bleed nipple, and drop the other end into a clear container partly filled with new brake fluid. This will allow the escaping air bubbles to be visible on each downward stroke of the foot brake pedal, and as long as the open end of the tube remains below the surface, only clean brake fluid will be sucked back into the system, if the nipple is not fully closed on the upward stroke.(A kit can be bought for this purpose). Whilst bleeding the brakes, it is essential to watch the brake fluid level in the master cylinder reservoir at all times and top it up regularly. An empty reservoir negates the whole process by allowing air back into the pipework again!
FootBrake Adjustment
It is very important to achieve correct adjustment on all four wheels. This should be done after all the other items above have been checked and corrected. Firstly, release the hand brake, and completely slacken the two adjusting wing nuts connecting the hand brake cables to the rear brakes. (This is necessary to prevent any residual hand brake tension affecting the adjustment of the footbrake.) The original hand-turned adjusters fitted to some SVW cars (especially early VA’s) are not always easy to set correctly. It is better to purchase the later designed hexagon head adjusters. These are a direct replacements and allow adjustment with a spanner, which is much more accurate. With each wheel jacked off the ground and both brake adjusters slackened sufficiently for the wheel to be spun freely, gradually tighten one of the adjusters. Maximum adjustment is less than a full turn, so this is a sensitive job. It helps if a second person is available to keep pressing the foot brake between adjustments to help the brake shoe centralise properly. (It is also very important on WA’s not to fully tighten any of the brake adjusters in one movement from the fully slack position without keeping the foot brake pressed, as the push rods between the hydraulic cylinder and brake shoes are very short and can drop out of position if the adjustment clearance becomes too large! This will either make the brake totally ineffective if the rod drops out completely, or can seriously reduce the braking effect on that wheel if the rod slips into a diagonal position and only exerts an oblique force on the shoe!). Each brake shoe is correctly adjusted when a very slight drag can be felt as the wheel is turned by hand through a complete revolution. The other brake adjuster on the same wheel should be tightened similarly. The very slight drag will soon disappear as the shoes bed in. (Note; If one or more of the brake drums become very hot after a few miles of normal driving, then it is probably the brakes which have been adjusted too tightly. The brake shoes on the hot drum will need slackening immediately as the fluid could reach boiling point and the brakes fail!) Drums should never become too hot to touch during normal driving! Remember the adjusters tighten in opposite directions! When looking from under the car towards the backplate, the left hand adjuster tightens anti-clockwise, and the right hand one tightens clockwise.
Hand Brake Adjustment
When the brakes on all four wheels have been adjusted, the two hand brake wing nuts previously slackened should be partially tightened with the hand brake in the off position. There must always be some slack in these two cables or the brakes will never release cleanly. The slack should be equal on both cables. It is good practice after adjustment to jack up both rear wheels simultaneously and gently spin them by hand to check that they are not binding.
All these checks may seem a bit daunting at first, but if you really want to experience your car as it felt the day it left Abingdon, then all these points need to be examined to find the one or two which need fixing. It would be very unusual to have all these faults simultaneously, they are all included here so each one can be checked once and problems identified and corrected. Once sorted, apart from routine brake adjustment and servicing, most will stay in good condition for very many years, so it will be worth all the effort! Best of luck, enjoy your driving and ‘Rock and Roll’ no more!